内存对齐 定义
内存对齐是一种计算机内存访问的优化策略。在计算机系统中,数据存储的地址通常要求按照一定的规则对齐。简单来说,就是数据存储的起始地址必须是某个特定值(通常是数据类型大小的倍数)的整数倍。例如,对于一个
4 字节的整数类型,其存储的起始地址最好是 4 的倍数。
目的
提高访问效率 :现代计算机处理器的内存访问是按块进行的,通常是字节对齐的。当数据按照内存对齐的方式存储时,处理器可以更高效地读取和写入数据。如果数据没有对齐,处理器可能需要进行多次内存访问才能读取或写入完整的数据,这会降低性能。硬件兼容性 :一些硬件设备对内存访问有对齐要求。例如,某些
CPU 架构在访问未对齐的数据时可能会产生硬件异常或者性能下降。
内存池 1 2 3 4 src/core/ngx_palloc.c
ngx_alloc ngx_alloc 本质上是对 malloc 的一层封装。
1 2 3 4 5 6 7 8 9 10 11 void *ngx_alloc (size_t size, ngx_log_t *log ) void *p;malloc (size);if (p == NULL ) {log , ngx_errno,"malloc(%uz) failed" , size);return p;
ngx_calloc 本质上是对 ngx_alloc 的封装,区别是会做 置 0 处理。
1 2 3 4 5 6 7 8 9 10 11 12 13 void *ngx_calloc (size_t size, ngx_log_t *log ) void *p;log );if (p) {return p;
ngx_memalign nginx 对此有两个封装,主要是 函数 memalign() 和
posix_memalign() 功能。
memalign函数不是标准的 POSIX
函数,它在一些系统中有实现,但可移植性相对较差。在 POSIX
兼容的系统中,更推荐使用posix_memalign。
因此,ngx_memalign 就是对 函数 memalign() 或
posix_memalign() 的一层封装而已。
alignment 代表内存对齐的字节数。这个值必须是 2 的幂次方。
size 代表要申请内存的大小,以字节为单位。
1
2
3
4
5
6
7
8
9
10
11
12
13
void *ngx_memalign (size_t alignment, size_t size, ngx_log_t *log ) void *p;if (p == NULL ) {log , ngx_errno,"memalign(%uz, %uz) failed" , alignment, size);return p;
1 2 3 4 5 6 7 8 9 10 11 12 13 14 15 16 void *ngx_memalign (size_t alignment, size_t size, ngx_log_t *log ) void *p;int err;if (err) {log , err,"posix_memalign(%uz, %uz) failed" , alignment, size);NULL ;return p;
前面介绍的 alloc 大家都不陌生,但是当前这两个函数确少有人知。
posix_memalign和memalign函数主要用于在内存中按照指定的对齐方式分配内存块。
1 2 3 4 5 6 7 8 9 10 函数原型:int posix_ memalign(void **memptr, size_ t alignment, size_ t size);_ t boundary, size_ t size);_ memalign的alignment类似,通常是 2 的幂次方。
ngx_palloc ngx_create_pool 1 2 3 4 5 6 7 8 9 10 11 12 13 14 15 16 17 18 19 20 21 22 23 24 25 26 27 28 ngx_pool_t *ngx_create_pool (size_t size, ngx_log_t *log ) ngx_pool_t *p;log );if (p == NULL ) {return NULL ;sizeof (ngx_pool_t ); NULL ; 0 ;sizeof (ngx_pool_t ); NULL ;NULL ;NULL ;log = log ;return p;
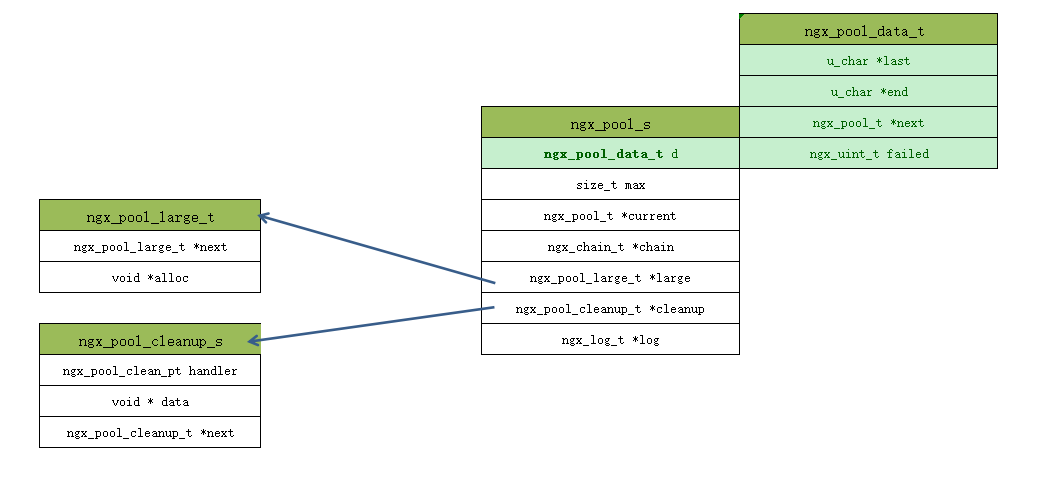
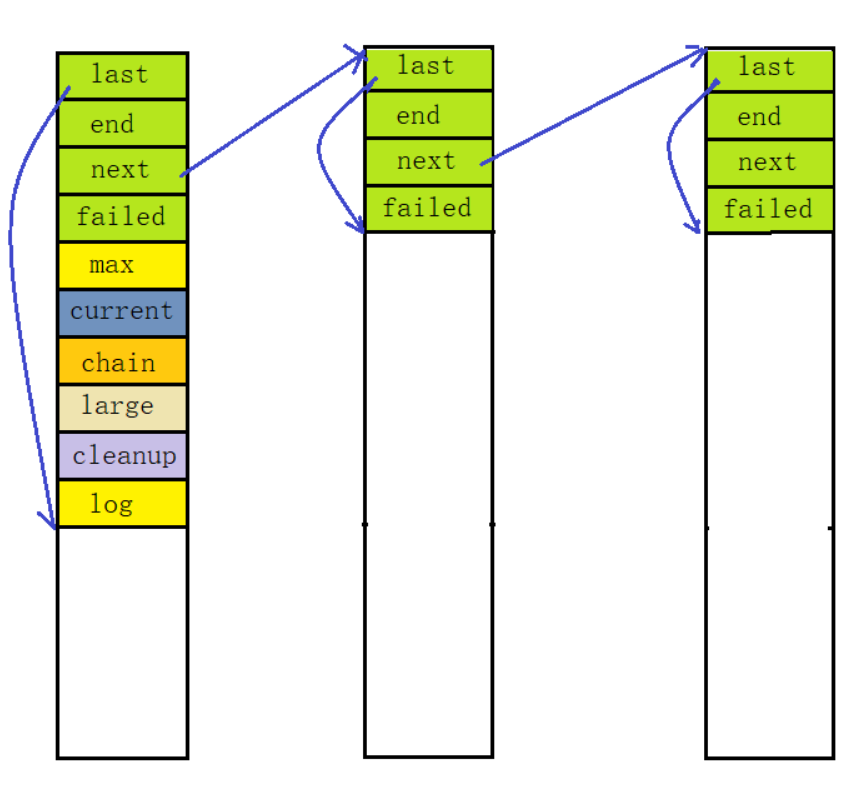
从代码中可以看出,内存池对象的核心结构是 ngx_pool_t,即
ngx_pool_s(nginx 会做这种 typedef 操作,两者等价,以后不再赘述)。
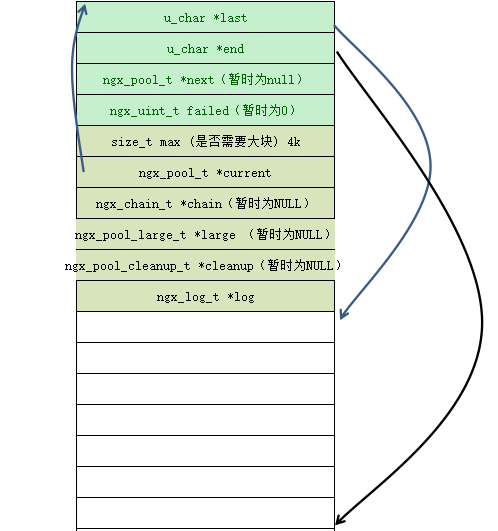
完成基本初始化操作,只有 p、max、current、log
成员进行实际初始化,其他成员一律为 NULL。
1 2 3 4 5 6 7 8 9 struct ngx_pool_s {ngx_pool_data_t d; size_t max; ngx_pool_t *current; ngx_chain_t *chain; ngx_pool_large_t *large; ngx_pool_cleanup_t *cleanup; ngx_log_t *log ;
示意图:
image20250110141223172.png
ngx_pool_data_t 结构体:
1 2 3 4 5 6 typedef struct {ngx_pool_t *next; ngx_uint_t failed; ngx_pool_data_t ;
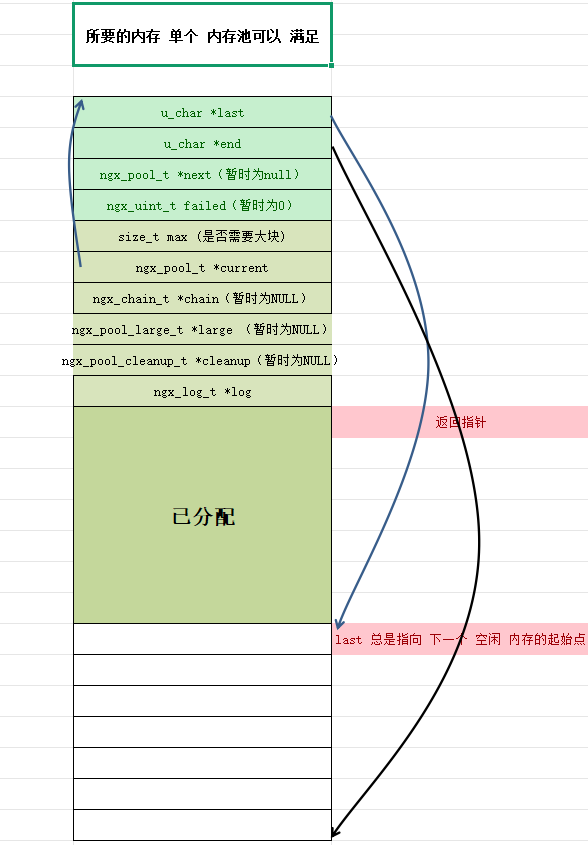
在创建内存池对象之后,就对其进行初始化,来表明这个内存池对象的空间情况。
image20250110150122296.png
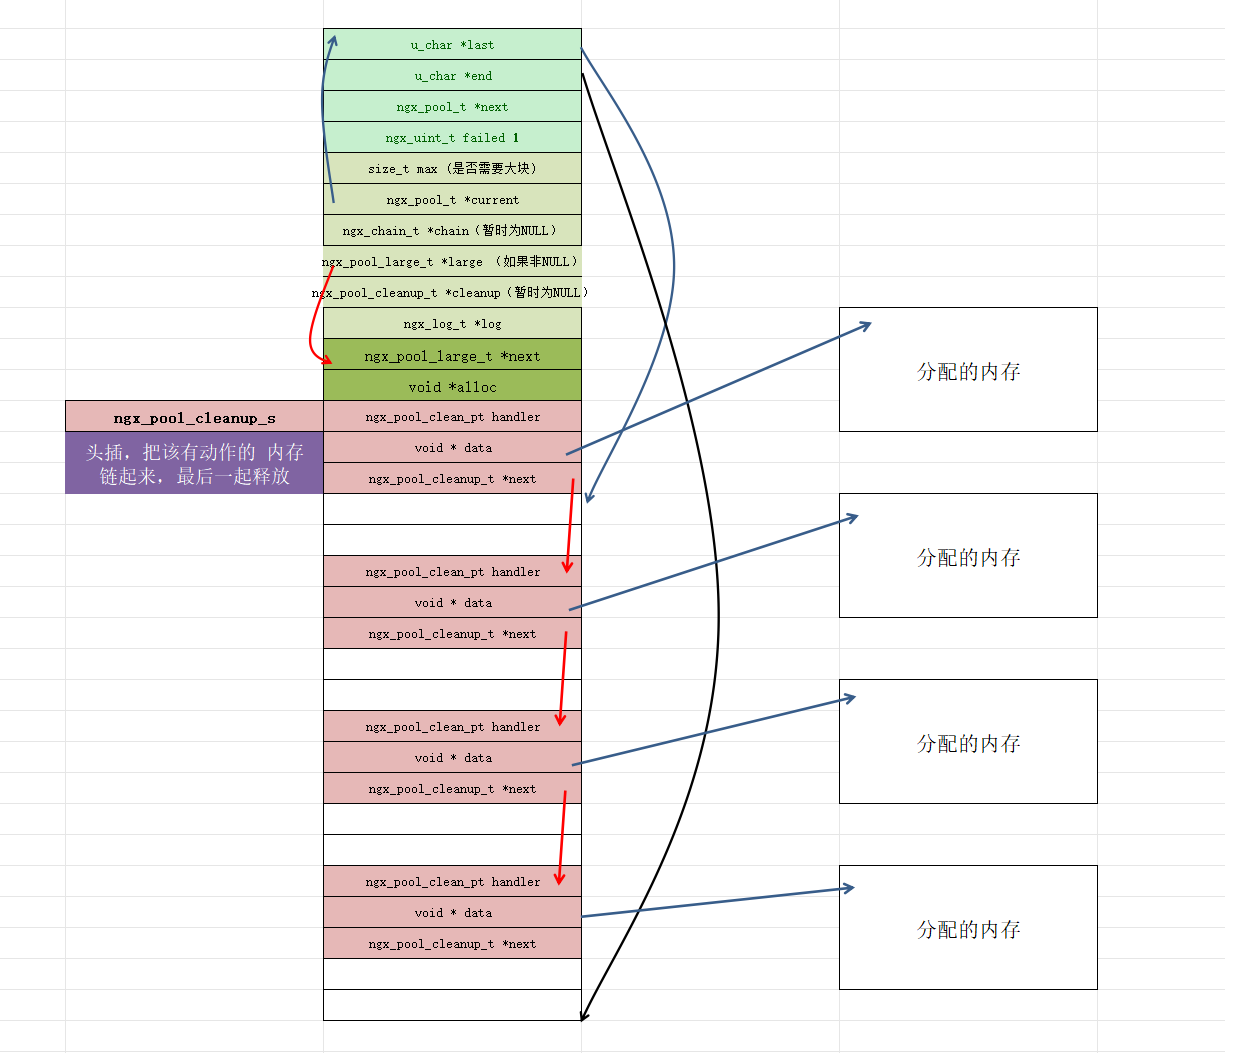
ngx_pool_cleanup_t 结构体:用于回收内存池
1 2 3 4 5 struct ngx_pool_cleanup_s {void *data; ngx_pool_cleanup_t *next;
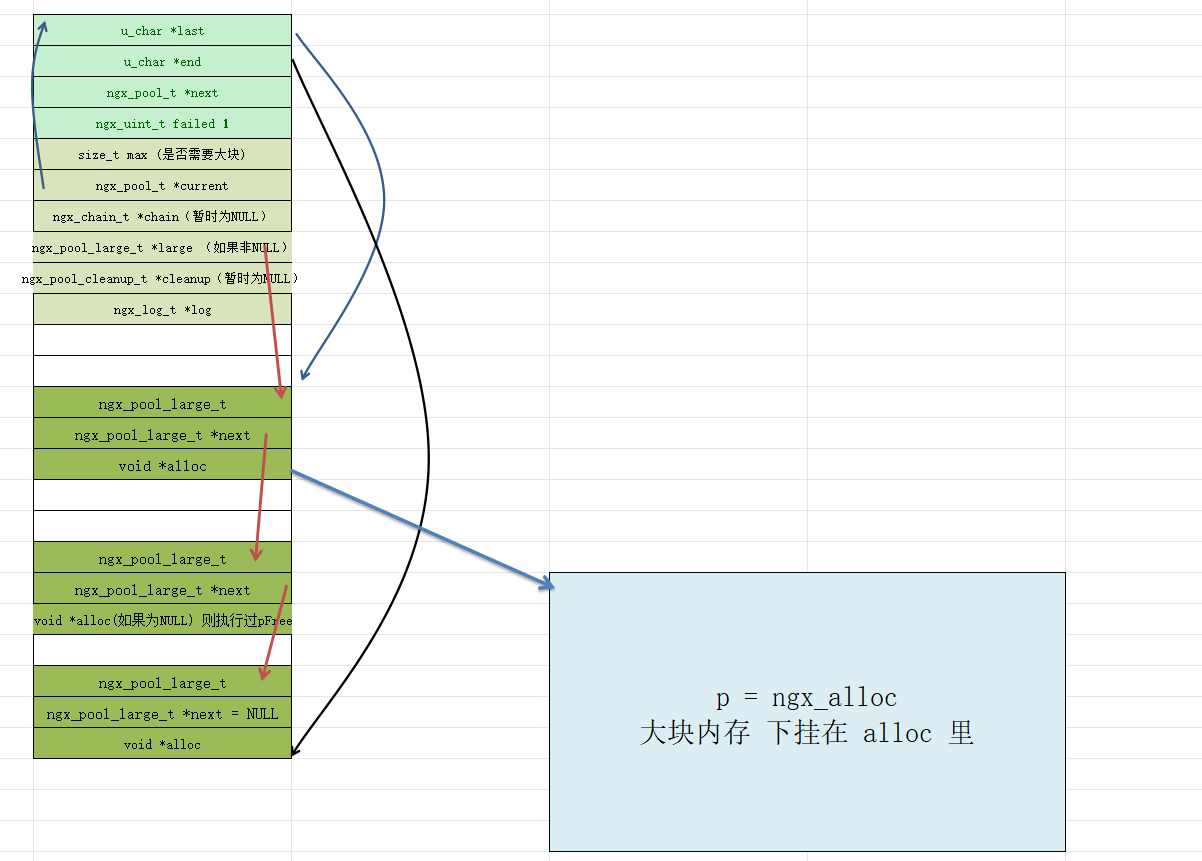
ngx_pool_large_s 结构体:用于大块分配
1 2 3 4 struct ngx_pool_large_s {ngx_pool_large_t *next; void *alloc;
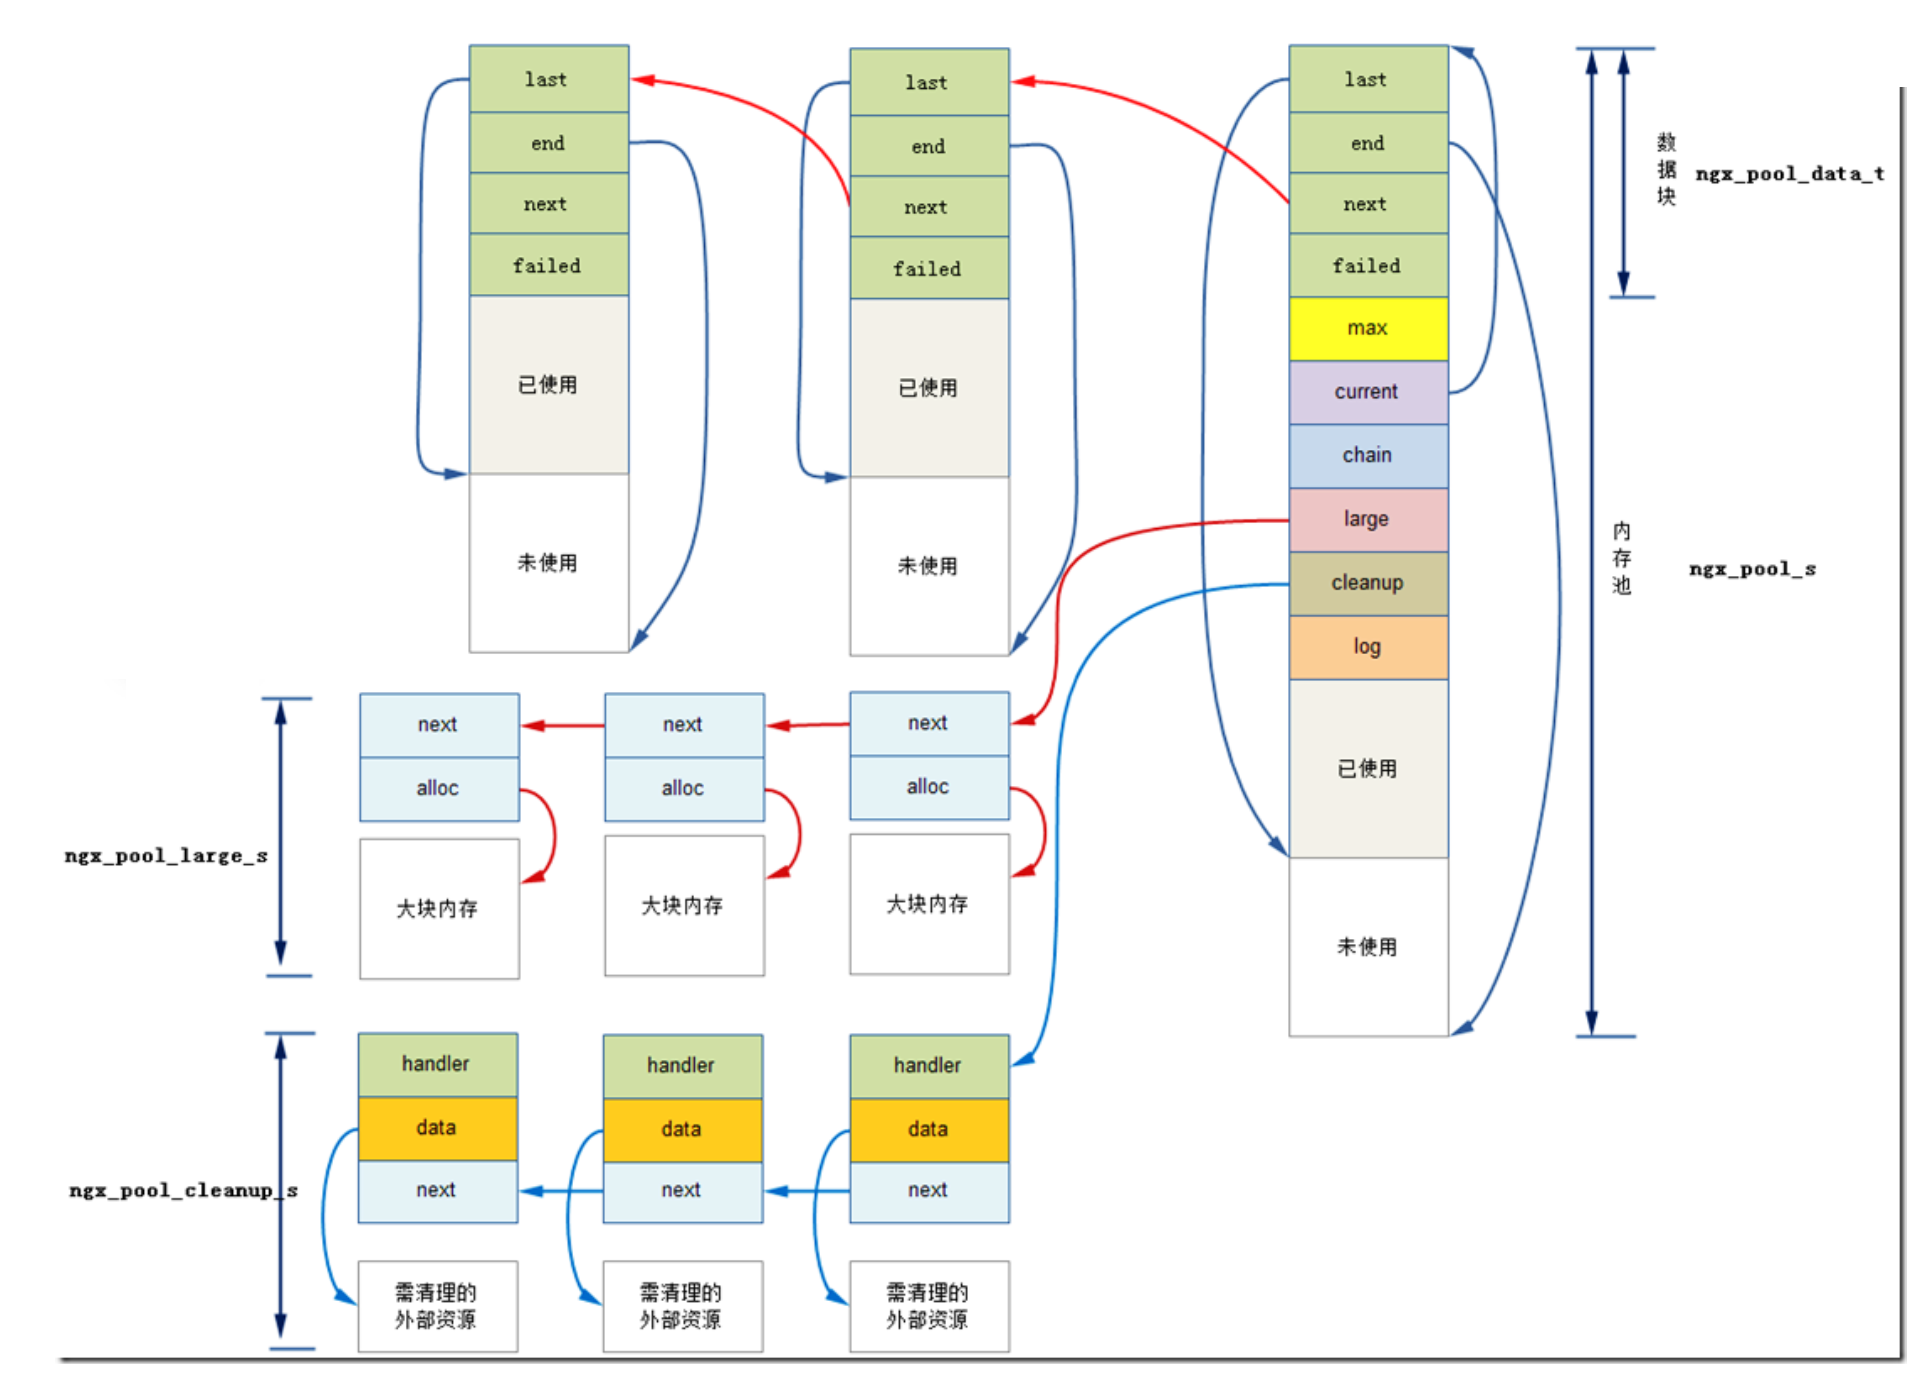
ngx_destroy_pool 就是将内存池进行资源回收,而资源回收先从内存池对象的内部成员开始,再从内存池对象本身下手。
1 2 3 4 5 6 7 8 9 10 11 12 13 14 15 16 17 18 19 20 21 22 23 24 25 26 27 28 29 30 31 32 33 34 35 36 37 38 39 40 41 42 43 44 45 46 47 48 49 50 51 52 53 54 void ngx_destroy_pool (ngx_pool_t *pool) ngx_pool_t *p, *n;ngx_pool_large_t *l;ngx_pool_cleanup_t *c;for (c = pool->cleanup; c; c = c->next) {if (c->handler) {log , 0 ,"run cleanup: %p" , c);#if (NGX_DEBUG) for (l = pool->large; l; l = l->next) {log , 0 , "free: %p" , l->alloc);for (p = pool, n = pool->d.next; ; p = n, n = n->d.next) {log , 0 ,"free: %p, unused: %uz" , p, p->d.end - p->d.last);if (n == NULL ) {break ;#endif for (l = pool->large; l; l = l->next) {if (l->alloc) {for (p = pool, n = pool->d.next; ; p = n, n = n->d.next) {if (n == NULL ) {break ;
示意图如下:
8dc31ddca90b1bffc52271ffddd765b.png
ngx_palloc 和 ngx_pnalloc 前面已经创建好内存池,后面使用者就需要用这个内存池给自己分配空间:
1 2 3 4 5 6 7 8 9 10 11 12 13 14 15 16 17 18 19 20 21 22 23 24 void *ngx_palloc (ngx_pool_t *pool, size_t size) #if !(NGX_DEBUG_PALLOC) if (size <= pool->max) { return ngx_palloc_small(pool, size, 1 );#endif return ngx_palloc_large(pool, size);void *ngx_pnalloc (ngx_pool_t *pool, size_t size) #if !(NGX_DEBUG_PALLOC) if (size <= pool->max) {return ngx_palloc_small(pool, size, 0 );#endif return ngx_palloc_large(pool, size);
区别在于,ngx_palloc_small 的第三个参数中,ngx_palloc 为
1,ngx_pnalloc 为 0,具体含义后面再做说明。
但至少,目前可以看到 nginx 的内存池在分配内存上,如果请求的大小 小于
当前内存池 一次性可分配的最大空间,就走小块分配,否则就走大块分配。
ngx_reset_pool 1 2 3 4 5 6 7 8 9 10 11 12 13 14 15 16 17 18 19 20 21 22 23 24 void ngx_reset_pool (ngx_pool_t *pool) ngx_pool_t *p;ngx_pool_large_t *l;for (l = pool->large; l; l = l->next) {if (l->alloc) {for (p = pool; p; p = p->d.next) {sizeof (ngx_pool_t );0 ;NULL ;NULL ;
示意图如下:
image20250111200613365.png
结合我们前面的源码分析,我们知道除了第一个内存池是通过
p->d.last = (u_char *) p + sizeof(ngx_pool_t)
来把可分配空间的起始地址放在 sizeof(ngx_pool_t)
之后。在后面创建的内存池都不是如此,ngx_palloc_block
函数中创建一个内存池,它是这样记录可分配空间的起始地址的,即
m += sizeof(ngx_pool_data_t),也就是可分配的起始地址放在
sizeof(ngx_pool_data_t) 之后。
但是我们这里的重置代码并不合格,而是所有内存池统一选择
sizeof(ngx_pool_t) 处置,所以就一部分空间被浪费了。
Nginx
浪费空间来提升性能,已经是很常见了,这里它也是在一劳永逸?但是要实现合理的重置方式也并不难。
下面才是正确的做法:
image20250111201410578.png
而且看过 ngx_destory_pool 函数都知道,还有 cleanup 链表
没有回收。对于这种小块内存它没有进行回收,我想也是为了效率。
ngx_palloc_small 1 2 3 4 5 6 7 8 9 10 11 12 13 14 15 16 17 18 19 20 21 22 23 24 25 26 27 static ngx_inline void *ngx_palloc_small (ngx_pool_t *pool, size_t size, ngx_uint_t align) ngx_pool_t *p;do {if (align) {if ((size_t ) (p->d.end - m) >= size) { return m; while (p); return ngx_palloc_block(pool, size);
首先,我们会找到一个有效的内存池对象地址,这只需要通过 pool 的
current 成员获取,它指向当前可用于分配的内存池指针地址。
接着,我们会获取内存池还未使用部分的起始地址。
如果 align = 1,针对指针类型进行类似的对齐操作。它将指针
p 按照指定的对齐要求 a
进行对齐,确保指针所指向的地址满足相应的内存对齐规则。
如果 align = 0,将不会进行上述操作。
前面我们已经获取可分配空间的起始地址
m,再接着获取结束地址与之求差得到当前内存池可分配的实际大小,如果
大于等于 就更新 d.last 信息,并返回可分配空间的起始地址 m。
image20250111154700878.png
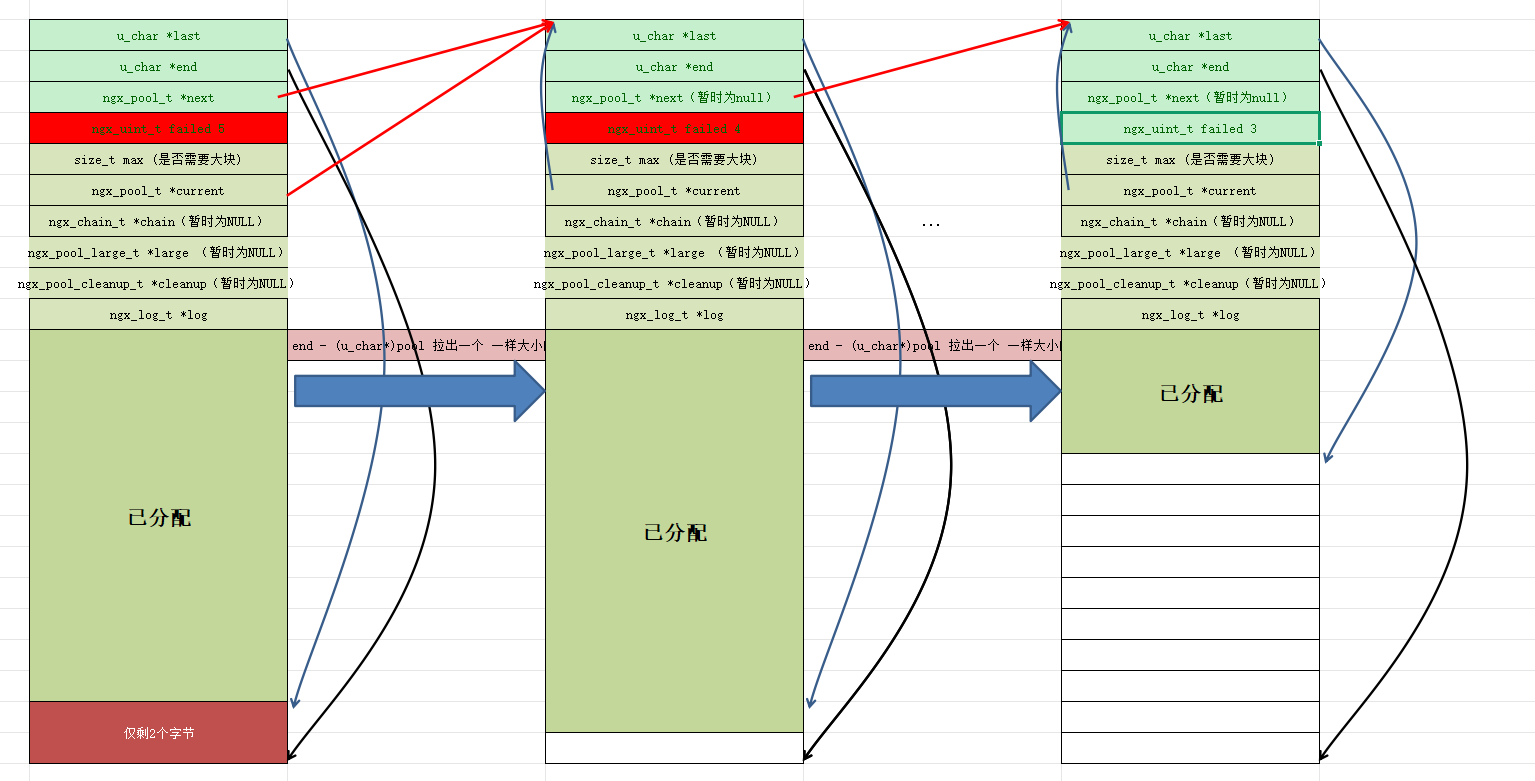
如果当前内存池的可用空间无法满足的请求的话,就会寻找下一个可用内存池,进入循环中进行判断,直到一个可用的内存池为止。
image20250111163415787.png
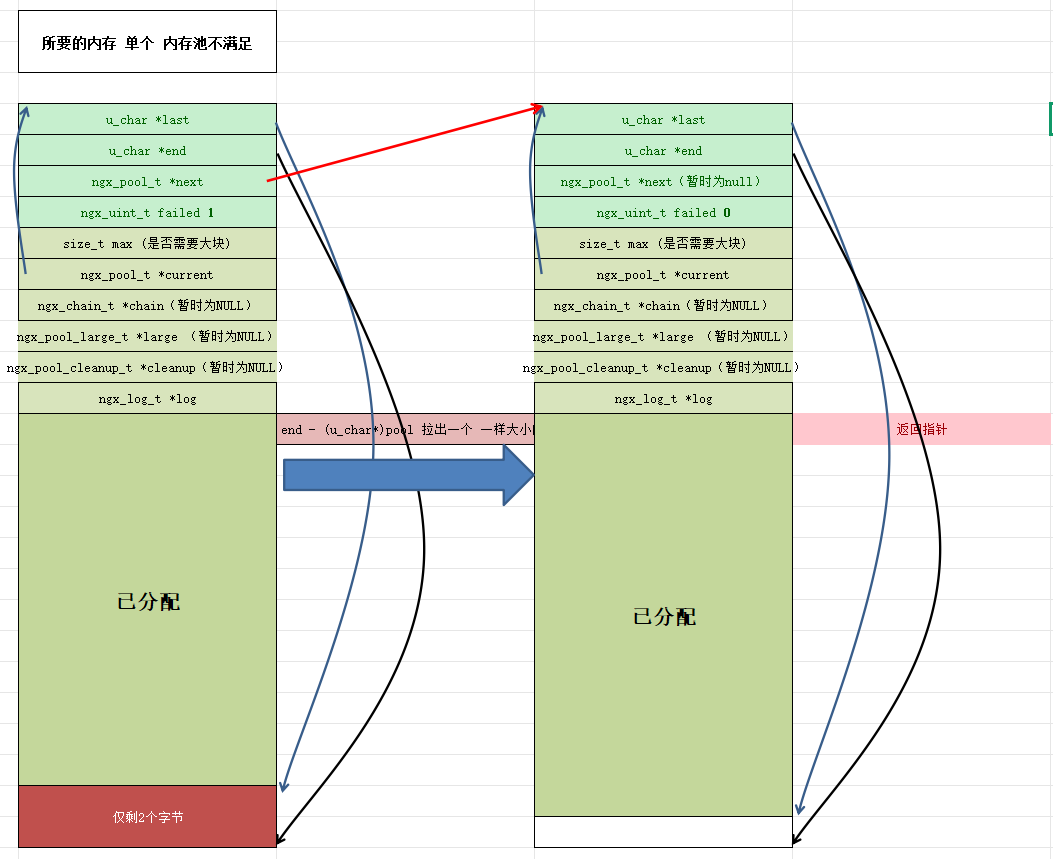
那如果还是无法满足呢?也就是目前已有的内存池都无法满足的情况下,就会调用
ngx_palloc_block(pool, size) 。
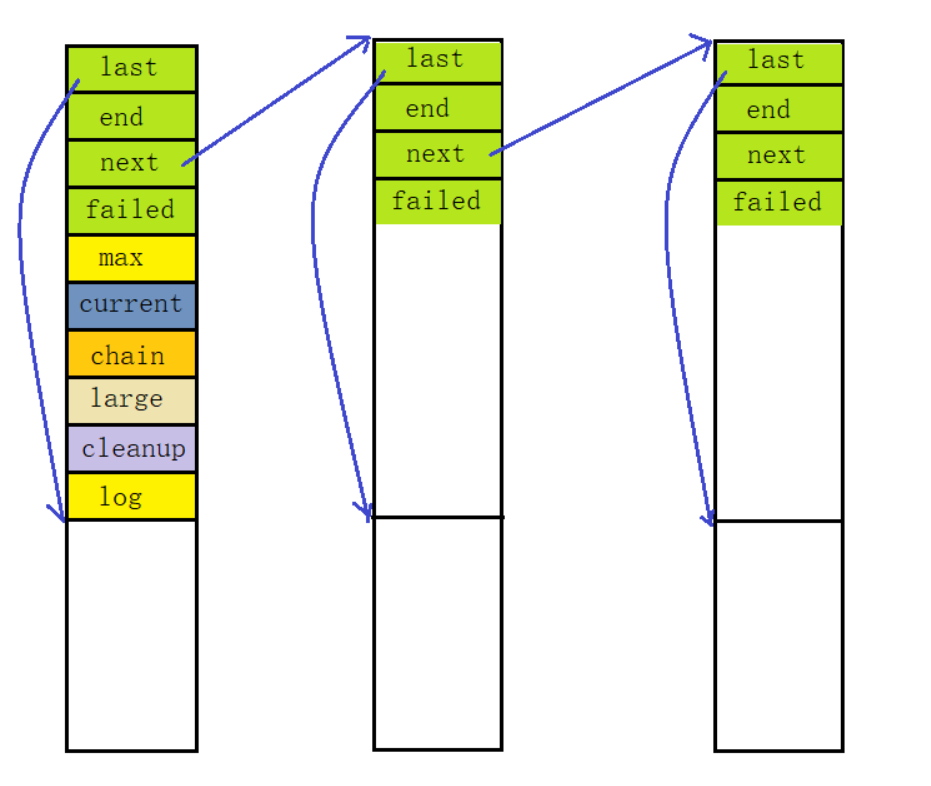
ngx_palloc_block 由于之前的内存池都已经不满足需求,因此就再创建一个同等大小的内存池,来满足需求。
1 2 3 4 5 6 7 8 9 10 11 12 13 14 15 16 17 18 19 20 21 22 23 24 25 26 27 28 29 30 31 32 33 34 35 36 37 38 39 40 static void *ngx_palloc_block (ngx_pool_t *pool, size_t size) size_t psize;ngx_pool_t *p, *new;size_t ) (pool->d.end - (u_char *) pool);log );if (m == NULL ) {return NULL ;ngx_pool_t *) m;NULL ;0 ;sizeof (ngx_pool_data_t );for (p = pool->current; p->d.next; p = p->d.next) {if (p->d.failed++ > 4 ) {return m;
巧妙设计部分对应的示意图:
image20250111171654240.png
ngx_palloc_large 讲完之前的小块分配,就该到大块分配。
1 2 3 4 5 6 7 8 9 10 11 12 13 14 15 16 17 18 19 20 21 22 23 24 25 26 27 28 29 30 31 32 33 34 35 36 37 38 39 40 41 42 43 44 45 46 47 static void *ngx_palloc_large (ngx_pool_t *pool, size_t size) void *p;ngx_uint_t n;ngx_pool_large_t *large;log ); if (p == NULL ) {return NULL ;0 ;for (large = pool->large; large; large = large->next) {if (large->alloc == NULL ) {return p;if (n++ > 3 ) {break ;sizeof (ngx_pool_large_t ), 1 );if (large == NULL ) {return NULL ;return p;
从内存池中分配得到 large 对象,然后 large 记录大块内存示意图:
image20250111174543751.png
ngx_pfree 前面刚刚讲到“如果 large->alloc ==
NULL,代表这块内存被释放了”,实际上就是 ngx_free 去释放掉大块内存。
1 2 3 4 5 6 7 8 9 10 11 12 13 14 15 16 17 18 ngx_int_t ngx_pfree (ngx_pool_t *pool, void *p) ngx_pool_large_t *l;for (l = pool->large; l; l = l->next) {if (p == l->alloc) {NULL ;return NGX_OK;return NGX_DECLINED;
ngx_pool_cleanup_add 1 2 3 4 5 6 7 8 9 10 11 12 13 14 15 16 17 18 19 20 21 22 23 24 25 26 27 ngx_pool_cleanup_t *ngx_pool_cleanup_add (ngx_pool_t *p, size_t size) ngx_pool_cleanup_t *c;sizeof (ngx_pool_cleanup_t ));if (c == NULL ) {return NULL ;if (size) {if (c->data == NULL ) {return NULL ;else {NULL ;NULL ;return c;
就是创建一个 ngx_pool_cleanup_t 对象,然后用 内存池的 cleanup
成员串起来,是个单链表串起来的。
ngx_pool_run_cleanup_file 1 2 3 4 5 6 7 8 9 10 11 12 13 14 15 16 17 18 19 void ngx_pool_run_cleanup_file (ngx_pool_t *p, ngx_fd_t fd) ngx_pool_cleanup_t *c;ngx_pool_cleanup_file_t *cf;for (c = p->cleanup; c; c = c->next) {if (c->handler == ngx_pool_cleanup_file) {if (cf->fd == fd) {NULL ;return ;
通过遍历内存池的 cleanup 中串联起来的 ngx_pool_cleanup_t
对象,然后调用 ngx_pool_cleanup_file 方法处理。
示意图如下:
image20250111205936324.png
ngx_pool_cleanup_file 1 2 3 4 5 6 7 8 9 10 11 12 13 void ngx_pool_cleanup_file (void *data) ngx_pool_cleanup_file_t *c = data;log , 0 , "file cleanup: fd:%d" ,if (ngx_close_file(c->fd) == NGX_FILE_ERROR) {log , ngx_errno," \"%s\" failed" , c->name);
跟进去就会发现 ngx_close_file 为 close,也就是关闭文件描述符。
ngx_pool_delete_file 1 2 3 4 5 6 7 8 9 10 11 12 13 14 15 16 17 18 19 20 21 22 23 24 25 26 void ngx_pool_delete_file (void *data) ngx_pool_cleanup_file_t *c = data;ngx_err_t err;if (ngx_delete_file(c->name) == NGX_FILE_ERROR) {if (err != NGX_ENOENT) {log , err," \"%s\" failed" , c->name);if (ngx_close_file(c->fd) == NGX_FILE_ERROR) {log , ngx_errno," \"%s\" failed" , c->name);
