vector 1 2 3 4 typedef simple_alloc<value_type, Alloc> data_allocator;
data_allocator 是一个类,里面含有公共的 4
个方法,《STL空间配置器》章节已对其源码进行分析。本质上就是两个功能,即内存的申请和释放。
另外三个成员很重要,我们将其转换为易读的方式:
1 2 3 T* start;
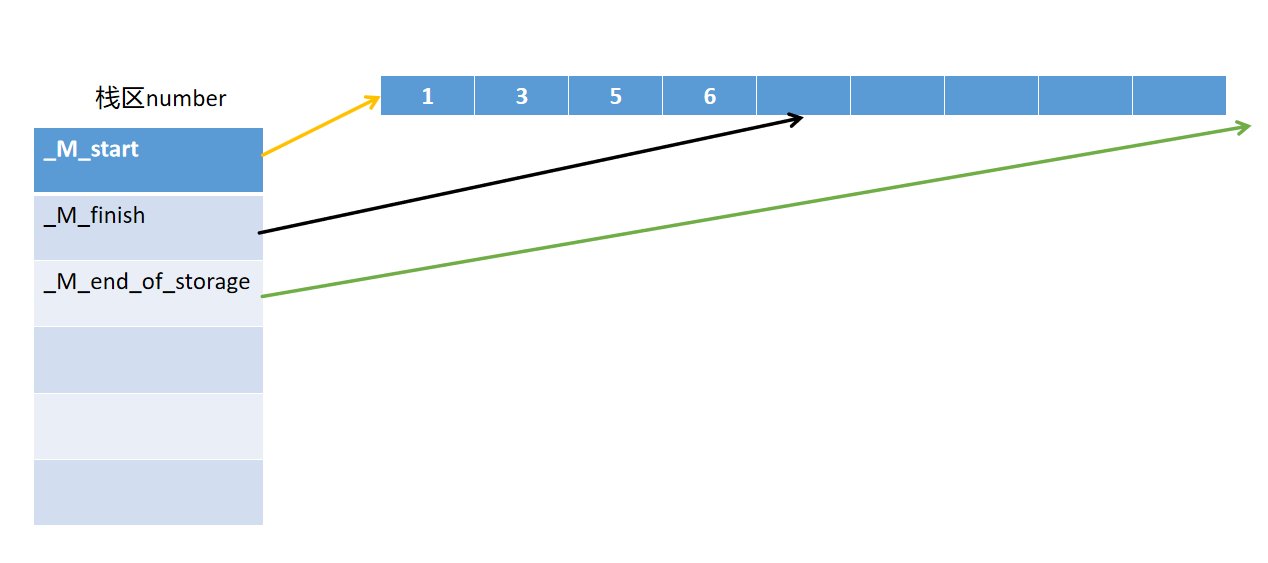
示意图:
底层原理.png
务必对这三个变量进行阐释,否则会有一些误解。
start 指向容器的起始地址,本质上就是容器的 begin 迭代器
finish 指向容器下一个添加元素的地址,本质上就是容器的 end
迭代器
end_of_storage 指向容器的终止地址,当 finish == end_of_storage
的时候就是容器已满的时候
start 指向容器的起始地址,也就暗指容器的第一个元素;finish
指向容器的下一个添加元素的地址,也就意味着它指向的地址还没有任何有效数据,我们是不可以访问的,否则会出现程序错误。
1 2 3 4 vector<int > data = { 1 ,2 ,3 ,4 };begin () << endl; end () <<endl;
push_back 1 2 3 4 5 6 7 8 void push_back (const T& x) if (finish != end_of_storage) {construct (finish, x);else insert_aux (end (), x);
核心跟进 insert_aux:
1 2 3 4 5 6 7 8 9 10 11 12 13 14 15 16 17 18 19 20 21 22 23 24 25 26 27 28 29 30 31 32 33 34 35 template <class T , class Alloc >void vector<T, Alloc>::insert_aux (iterator position, const T& x) {if (finish != end_of_storage) { construct (finish, *(finish - 1 ));copy_backward (position, finish - 2 , finish - 1 );else { const size_type old_size = size ();const size_type len = old_size != 0 ? 2 * old_size : 1 ;allocate (len);uninitialized_copy (start, position, new_start); construct (new_finish, x); uninitialized_copy (position, finish, new_finish);# ifdef __STL_USE_EXCEPTIONS catch (...) {destroy (new_start, new_finish); deallocate (new_start, len);throw ;# endif destroy (begin (), end ());deallocate ();
如果 原始长度不为 0,那么 len 就为 old_size(原容器的元素个数)
的两倍,否则就是为 1。
等到申请 len
内存空间之后,把原容器的数据拷贝到新容器中,并且把之前要加入的元素放到最新的容器中,然后析构原容器,并更新
statr、finish、end_of_storage。
但是“把原容器的数据拷贝到新容器中”要单独拿出来说,上面关于这里的表述是专门针对
push_back 而言(我的意思是第二次的 uninitialized_copy 对于
push_back 而言可有可无),但是 insert_aux 并不是只会被 push_back
调用,还有可能被其他函数调用(关于这点,已在代码注释中说明)。
1 iterator insert (iterator position) { return insert (position, T ()); }
总的来讲,insert_aux (iterator position, const T& x)
是要在 postion 处插入元素 x。那么上面的这份代码的原意如下:
第一次 uninitialized_copy :将原
vector 中的前半部分 [start, position)
元素复制到新的存储空间 new_start 开始的位置。
1 new_finish = uninitialized_copy (start, position, new_start);
这样做是为了在新分配的空间中保留旧的元素,而 position
是插入点的迭代器,插入的元素将位于新数组中的这个位置。
插入新元素 x :在插入位置构造元素
x。
1 2 construct (new_finish, x);
这里使用 construct 将新元素 x
插入到目标位置 position(对应新空间的
new_finish 位置)。
第二次 uninitialized_copy :将原
vector 中的后半部分 [position, finish)
元素复制到 new_finish 开始的剩余空间。
1 new_finish = uninitialized_copy (position, finish, new_finish);
这一步完成了剩余元素的复制,使得原 vector
的所有元素(以及新插入的
x)都复制到扩容后的存储空间中。
insert 1 2 3 4 5 6 7 8 9 10 11 12 13 14 15 16 17 18 19 20 21 22 23 24 25 26 27 28 29 30 31 32 33 34 35 36 37 38 39 40 41 42 43 44 45 46 template <class T , class Alloc >void vector<T, Alloc>::insert (iterator position, size_type n, const T& x) {if (n != 0 ) { if (size_type (end_of_storage - finish) >= n) { const size_type elems_after = finish - position; if (elems_after > n) { uninitialized_copy (finish - n, finish, finish);copy_backward (position, old_finish - n, old_finish);fill (position, position + n, x_copy);else { uninitialized_fill_n (finish, n - elems_after, x_copy);uninitialized_copy (position, old_finish, finish);fill (position, old_finish, x_copy);else { const size_type old_size = size (); const size_type len = old_size + max (old_size, n); allocate (len); uninitialized_copy (start, position, new_start);uninitialized_fill_n (new_finish, n, x);uninitialized_copy (position, finish, new_finish);# ifdef __STL_USE_EXCEPTIONS catch (...) {destroy (new_start, new_finish);deallocate (new_start, len);throw ;# endif destroy (start, finish);deallocate ();
剩余空间不足以添加 n 个元素,如果原元素个数 size 大于
准备添加的元素个数 n,那么重新申请空间大小为 2倍的 size,否则就是 size +
n。切记,不是两倍的扩容哦,之前我们的 vector 的 push_back 的扩容虽然是
两倍的 size,但是 push_back 触发扩容的时候,已经是 size ==
capacity,所以我们看到扩容之后的 capacity 是 两倍的
capacity。但是,insert 的扩容机制是基于 size 和 n 来进行两倍的 size 或者
size + n 来扩容的,这是二者的区别。
erase 此接口在多出被调用,特此拿出来分析:
copy
方法在此前已经分析过,就是遍历第一个参数到第二个参数,然后逐一赋值给
position(逐步自增)。
放到这里就是用后面的元素(本质是迭代器)覆盖前面指定的 position
位置。
1 2 3 4 5 6 7 iterator erase (iterator position) {if (position + 1 != end ())copy (position + 1 , finish, position);destroy (finish);return position;
前面介绍的是删除指定位置处的元素,而这里要讲的是范围删除元素。
1 2 3 4 5 6 iterator erase (iterator first, iterator last) {copy (last, finish, first);destroy (i, finish);return first;
erase
确确实实删除指定位置的元素了(即迭代器),本质是被后面的元素(即迭代器)覆盖。
erase 改变 size 大小,但不会改变 capacity 大小。
最后,不管是那种删除,返回值是删除元素部分的下一个迭代器。如果是 end
那就视为容器里面已经没有元素可删,如果不是 end
那就必然保证这是一个有效的迭代器(删除的元素的下一个位置的迭代器)。
shrink_to_fit 在 std::vector 容器中,erase
函数会从逻辑上移除元素并减少 vector
的大小,但不会释放其底层内存。因此,erase
不会真正减少 vector 的容量 。
逻辑删除 :erase
会将指定位置或区间的元素从 vector 中移除,并调整
vector 的大小
(size)。被删除的元素会被销毁(调用其析构函数),但
vector 的容量 (capacity) 不会改变。底层内存 :vector 的
capacity 表示已分配的底层内存,可以容纳的元素总量。在使用
erase 删除元素后,vector
的容量保持不变,这意味着底层的内存空间仍然保留,以便后续在不重新分配内存的情况下添加新元素。
C++11 提供 shrink_to_fit
函数,用以释放多余的内存,下面是核心代码实现:
1 2 3 4 5 6 7 8 9 10 template < typename _Alloc > void vector < bool ,this - >_M_allocate(__n);0 );begin (), end (), __start));this - >_M_deallocate();this - >_M_impl._M_start = __start;this - >_M_impl._M_finish = __finish;this - >_M_impl._M_end_of_storage = __q + _S_nword(__n);
可以看到确实在对空间进行重新申请和回收,并更新
start、finish、end_of_storage。
由于我们的 erase 方法会更改 finish 的值,也就意味着 size
会更改,进而会把多余的内存实际销毁掉。
resize 1 2 3 4 5 6 7 8 9 10 void resize (size_type new_size) resize (new_size, T ());void resize (size_type new_size, const T & x) if (new_size < size ()){erase (begin () + new_size, end ()); else {insert (end (), new_size - size (), x);
如果 resize 的大小 小于 原先大小(即元素个数)会调用
erase,导致其后的迭代器失效。
如果 resize 的大小 大于 原先大小会调用 insert,如果 resize 的大小比
capacity 小,那么只会导致 end()
迭代器失效,但不影响其他迭代器。但如果 resize 的大小比 capacity
大,就会导致重新分配内存,迭代器全部失效。
reserve 形参 n 代表新容量的大小,只有 n
大于当前容量,才会实际去扩容,否则就相当于没有任何执行意义。
n > capacity 的话,就是新分配 n
个大小的内存空间,然后把原先的数据拷贝到该区域后析构,然后更新
start、finsih、end_of_storage。
1 2 3 4 5 6 7 8 9 10 11 12 vector < T,Alloc > &operator = (const vector < T, Alloc > &x);void reserve (size_type n) if (capacity () < n) {const size_type old_size = size ();allocate_and_copy (n, start, finish);destroy (start, finish);deallocate ();
正确使用 reserve 可以防止不必要的重新分配,但不恰当地使用
reserve(例如,在每次 push_back
调用之前调用它)实际上可能会增加重新分配的次数。
因为 vector
只有在最开始初始化的时候有机会指定容量大小,此后只能在插入后等待底层自行扩容。我们想象这样一种情景,你的
vector
现在容量很大,并且元素数量即将接近触发扩容的边缘,但是你知晓后面用不到太大的空间,为了避免浪费空间资源,你可以选择
reserve。虽然它也会
重新分配内存,但是你后面因为添加元素导致扩容是一样的,可前者会在你合理的设计下减少内存空间的白白浪费。
clear 让所有迭代器失效,size 为 0,capacity 保持不变。
1 2 3 void clear () erase (begin (), end ());
emplace_back 1 2 3 4 void emplace_back ( _Args && ... __args ) push_back ( bool (__args ...) );
你可能好奇这不就是把 push_back 封装了一下?
实际上不是这样的,这是不同的函数接口,只是名称相同而已:
1 2 3 4 5 6 7 8 9 10 11 12 13 14 15 16 17 18 19 20 21 22 23 24 25 26 27 28 29 30 31 32 vector<_Tp, _Alloc>::emplace_back ( _Args && ... __args ) if ( this ->_M_impl._M_finish != this ->_M_impl._M_end_of_storage )construct ( this ->_M_impl, this ->_M_impl._M_finish, this ->_M_impl._M_finish;else end (), std::forward<_Args>( __args ) ... );#if __cplusplus > 201402L return (back () );#endif void push_back ( const value_type & __x ) if ( this ->_M_impl._M_finish != this ->_M_impl._M_end_of_storage )construct ( this ->_M_impl, this ->_M_impl._M_finish,__x ); this ->_M_impl._M_finish;else end (), __x );void push_back ( value_type && __x ) emplace_back ( std::move ( __x ) );
我们通常把 emplace_back 和 push_back
进行比较,它们的功能都是把元素插入到容器末尾。
但是在使用上有所区别:
push_back
接受一个已创建的临时对象,将它拷贝/移动到容器的末尾。emplace_back
接受的是构造函数的参数,而不是对象本身,在容器末尾直接构造元素。可避免一次拷贝/移动。
实际你去跟代码(暂时不考虑移动构造函数),你就会发现,正因为你
push_back 传递的是对象,进而走向拷贝构造函数。emplace_back
传递的是对象所需的参数,进行走向构造函数。
验证代码见下:
1 2 3 4 5 6 7 8 9 10 11 12 13 14 15 16 17 18 19 20 21 22 23 24 25 26 27 28 #include <vector> #include <iostream> using namespace std;class testDemo public :explicit testDemo (int num) :num(num){"调用构造函数" << endl;testDemo (const testDemo& other) :num (other.num) {"调用拷贝构造函数" << endl;testDemo (testDemo&& other) noexcept :num (other.num) {"调用移动构造函数" << endl;private :int num;int main () "emplace_back:" << endl;1. emplace_back (2 );"push_back:" << endl;testDemo t1 (2 ) ;2. push_back (t1);
输出结果:
1 2 3 4 5 emplace_back:
push_back
底层会优先调用移动构造函数,如果不可以才会调用拷贝构造函数。
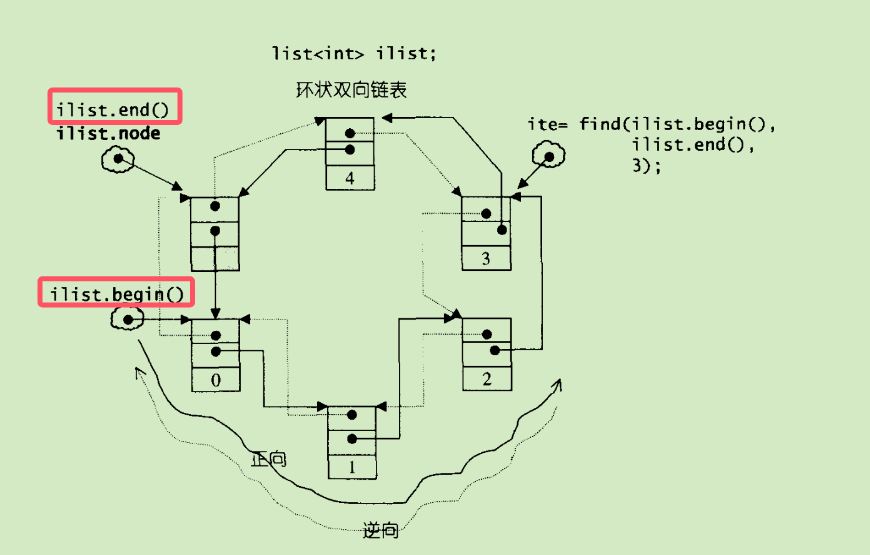
list list 是一个环状双向链表(循环双向链表)。
list.png
list 和此前的 vector 有所不同,没有 capacity 概念,因为 size 就是
capacity。这就让 list 和 vector 有所不同的是,list 的 erase 方法实际更改
size 和 capacity,而 vector 的 erase 方法只更改了 size。
这里实际上只会去看看 list
独属于自己的一些接口,这些接口并非其它容器就一定没有(在 algorithm
中)。但由于 list 的数据结构,它自己单独实现这些接口,因此你不可以使用
algorithm 的相关接口来操作 list,只能用它自己的。
transfer 1 2 3 4 5 6 7 8 9 10 11 12 13 void transfer ( iterator position, iterator first, iterator last ) if ( position != last )link_type ( (*last.node).prev ) ) ).next = position.node;link_type ( (*first.node).prev ) ) ).next = last.node;link_type ( (*position.node).prev ) ) ).next = first.node;link_type ( (*position.node).prev );
多个地方用到该接口,特此分析。为了方便理解,代码呈现如下:
1 2 3 4 5 6 7 8 9 10 11 12 13 14 15 16 17 18 19 20 21 void transfer ( iterator position, iterator first, iterator last ) if ( position != last )link_type ( (*position.node).prev );link_type ( (*last.node).prev );link_type ( (*first.node).prev );link_type ( (*position.node).prev );
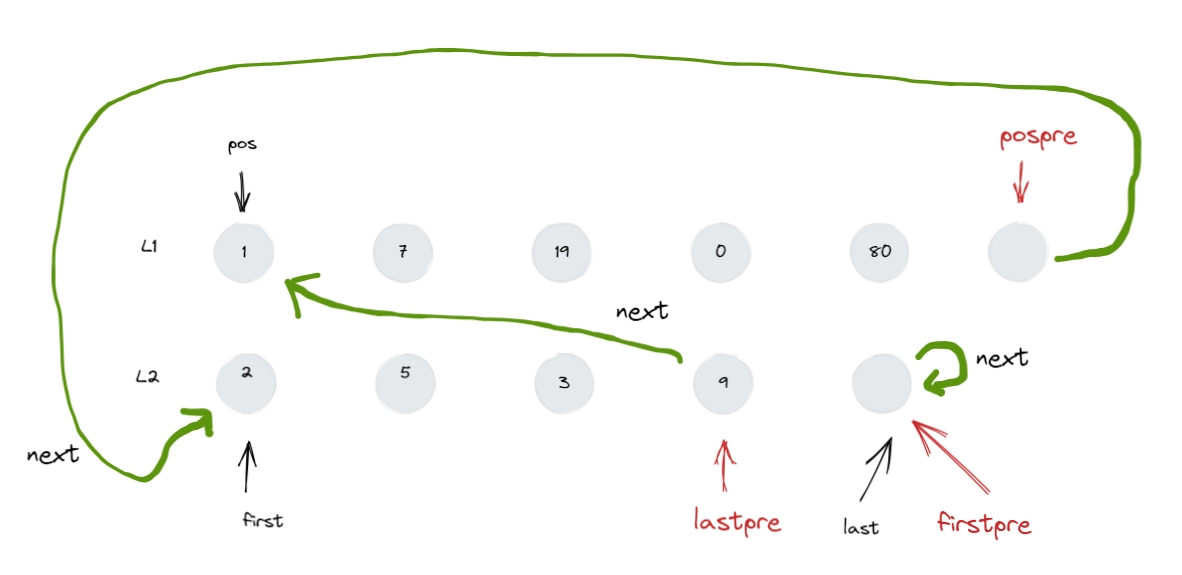
初始形态:
01.png
第一阶段:
02.png
第二阶段:
03.png
第三阶段:
04.png
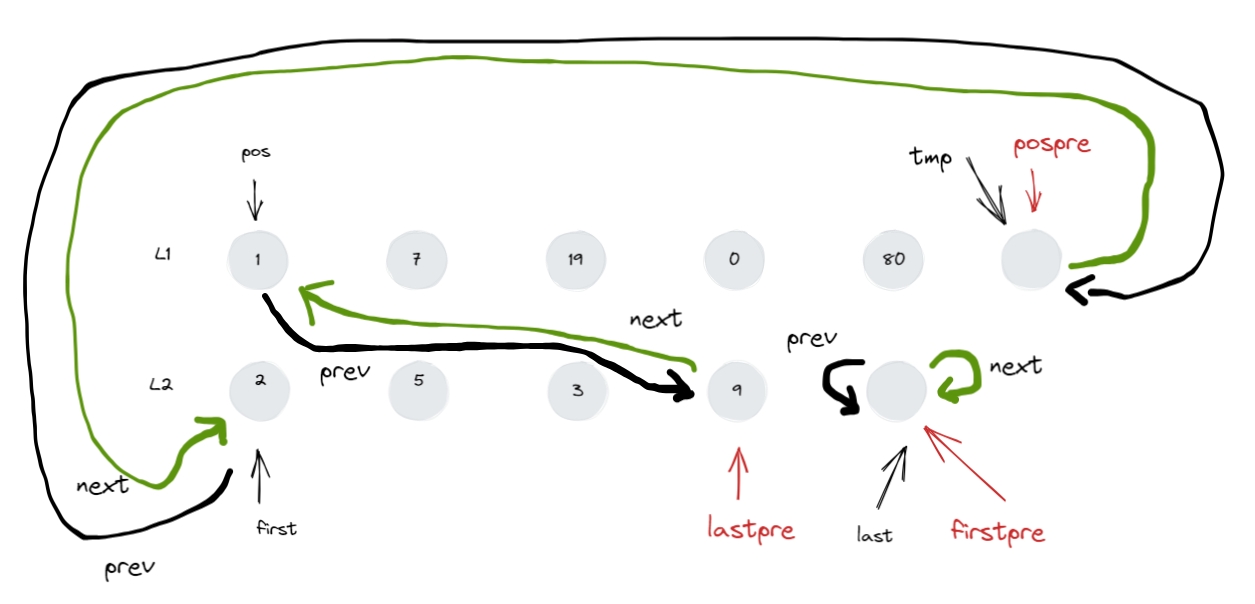
把核心节点的 prev 和 next 画出来:
05.png
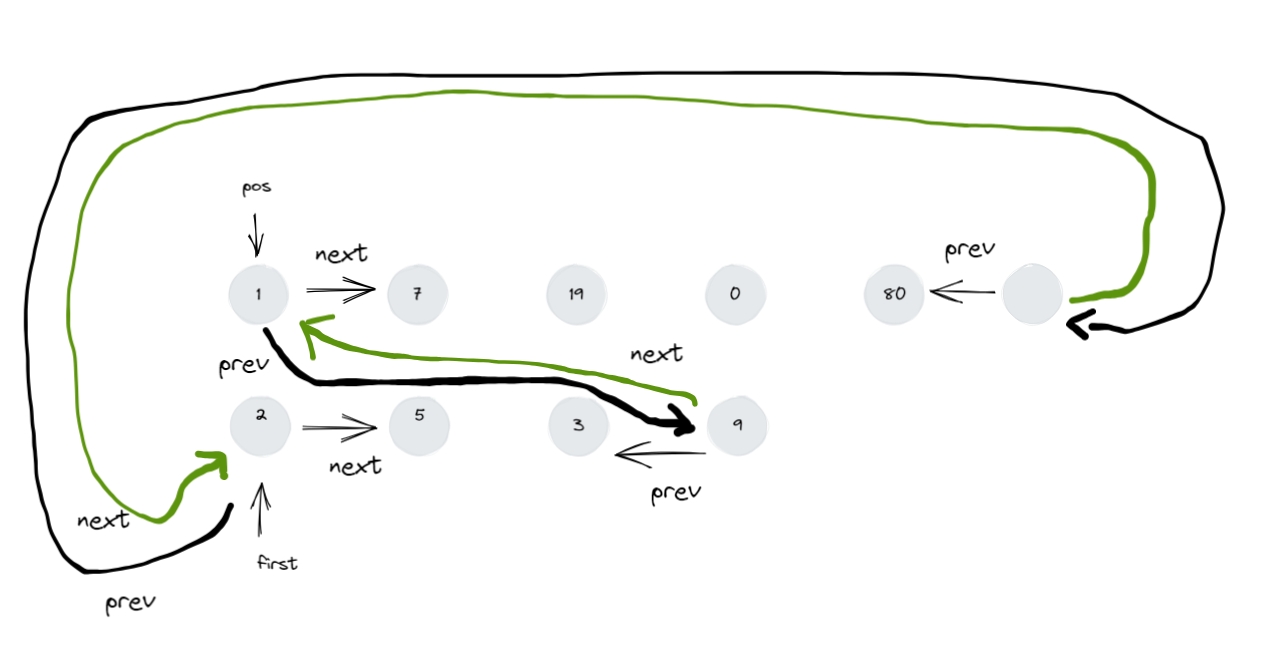
整理成 人能看的样子:
06.png
把最初的形参情况拿过来对照着看:transfer(position, first, last)
就是把 [first,last) 内的节点 拼接 到
position 之前。
注意: [first,last) 是左闭右开。
merge 1 2 3 4 5 6 7 8 9 10 11 12 13 14 15 16 17 18 19 template <class T , class Alloc >void list<T, Alloc>::merge (list<T, Alloc>& x) {begin ();end ();begin ();end ();while (first1 != last1 && first2 != last2)if (*first2 < *first1) {transfer (first1, first2, ++next);else {if (first2 != last2) {transfer (last1, first2, last2);
从代码实现来看,是将传入的链表 x 合并到当前链表(merge
调用方),并且还会进行有序插入(递增),而非把链表 x 直接 merge
到当前链表的尾部。
但是这个有序插入并不是说,merge
之后链表就是必然有序。你可以看到是让当前链表和传入的链表进行大小比较,如果当前链表
小于等于
传入的链表,那么当前链表迭代器增加进入下一轮。否则才会把传入的链表比较的那个节点加入到当前链表中,即当前链表比较节点的前一个位置。
等到最后的
if (first2 != last2) transfer(last1, first2, last2);
操作就是把传入的链表 x
剩余的节点给一起合并到当前节点尾部,因为可能没有被遍历完全。
至于当前链表没有遍历完节点不用管,那是因为加入节点的行为就是在其上操作的,自然不必考虑这个问题。
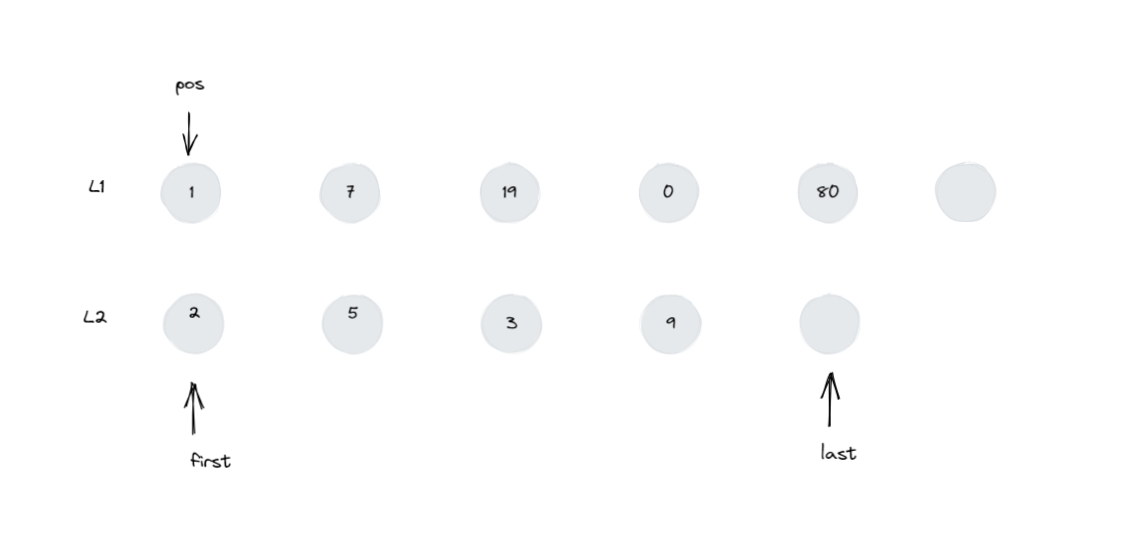
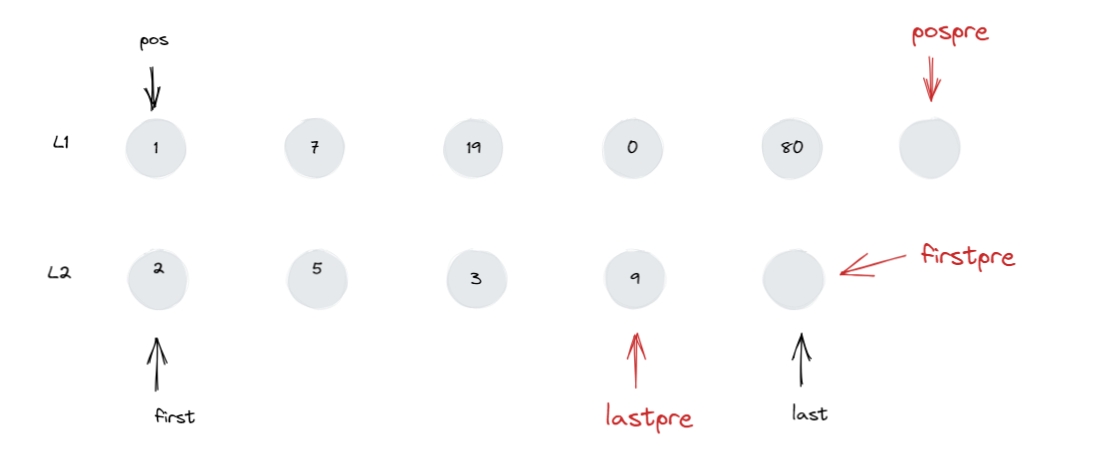
1 2 3 4 5 6 list<int > l1 = { 1 , 7 , 19 , 0 , 80 };int > l2 = { 2 , 5 , 3 , 9 };1. merge ( l2 );
所以网上那些说 merge 需要传递两个有序的链表自然是不正确的,但你要知道
merge 有种有序性在里面,通过传递两个有序的链表可以 merge
出一个有序的链表出来,这也是官方案例在 merge
之前会把两个链表各自调用一次 sort 方法。
reverse 1 2 3 4 5 6 7 8 9 10 11 template <class T , class Alloc >void list<T, Alloc>::reverse () {if (node->next == node || link_type (node->next)->next == node) return ;begin (); while (first != end ()) { transfer (begin (), old, first);
因为 list 本身迭代器的受限,只能通过先存储 begin 迭代器,进行 ++
来到第二个迭代器,如果只有一个节点没有必要进行反转。
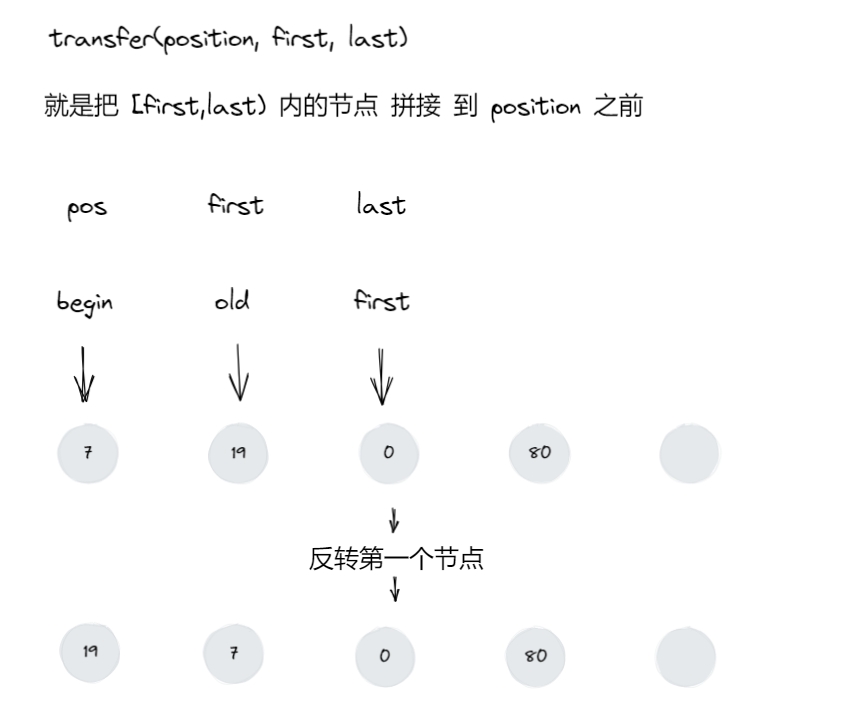
结合前面我们讲的 transfer,很容易理解这里的行为。下面就简单举例。
第一次:transfer(begin(), old, first)
07.png
整个循环,只会导致 old 和 first 迭代器会改变,而 begin
这个迭代器始终指向图中节点 7。
sort 1 2 3 4 5 6 7 8 9 10 11 12 13 14 15 16 17 18 19 20 template <class T , class Alloc > template <class StrictWeakOrdering >void list<T, Alloc>::sort (StrictWeakOrdering comp) {if (node->next == node || link_type (node->next)->next == node) return ;64 ];int fill = 0 ;while (!empty ()) {splice (carry.begin (), *this , begin ());int i = 0 ;while (i < fill && !counter[i].empty ()) {merge (carry, comp);swap (counter[i++]);swap (counter[i]); if (i == fill) ++fill;for (int i = 1 ; i < fill; ++i) counter[i].merge (counter[i-1 ], comp);swap (counter[fill-1 ]);
sort 可以接受一个函数对象 comp,不要去管 sort 底层的实现,重点观察到
counter[i].merge(carry, comp) 把 comp 继续传递,再跟:
1 2 3 4 5 6 7 8 9 10 11 12 13 14 15 16 template <class T , class Alloc > template <class StrictWeakOrdering >void list<T, Alloc>::merge (list<T, Alloc>& x, StrictWeakOrdering comp) {begin ();end ();begin ();end ();while (first1 != last1 && first2 != last2)if (comp (*first2, *first1)) {transfer (first1, first2, ++next);else if (first2 != last2) transfer (last1, first2, last2);
就可以看到 if (comp(*first2, *first1))
自动会把元素遍历并放到函数对象中进行执行。因此我们的函数对象是要支持接受两个容器元素,但我们在传递的时候直接传函数对象即可。代码如下:
1 2 3 4 5 6 7 8 9 10 11 12 class Test {public :bool operator () (int num1,int num2) return num1 > num2;}int main () int > data = {1 ,2 ,10 ,5 };sort (Test ());return 0 ;
splice--拼接 1 2 3 4 5 6 7 8 9 10 11 12 13 14 15 16 17 18 19 20 21 22 23 void splice ( iterator position, list & x ) if ( !x.empty () )transfer ( position, x.begin (), x.end () );void splice ( iterator position, list &, iterator i ) if ( position == i || position == j )return ;transfer ( position, i, j );void splice ( iterator position, list &, iterator first, iterator last ) if ( first != last )transfer ( position, first, last );
还有就是该接口调用与 list
无关,关键是你传递的参数,这我们在源码中已经看得清楚:
1 2 3 4 5 6 7 8 9 10 11 12 13 14 15 16 17 18 19 20 21 22 23 24 25 template <typename T>void showContainer (const T& data) for (const auto & item : data) {" " ;int main () int > data = {1 ,2 ,3 ,3 ,3 ,5 };int > demo = {10 ,3 ,89 };int > tmp = {30 ,33 ,389 };auto it = data.begin ();splice (tmp.begin (),demo);showContainer (data);showContainer (tmp);return 0 ;
尽管我们是 data.splice(tmp.begin(),demo)
,但是我们传递的却是与 data 毫无关联的迭代器和 list,所以被操作的对象是
demo 这个 list 容器和 tmo 这个 list 容器的 begin 迭代器。
我们对上面三个接口,作出这般解释:
整体转移 :一个列表 list2
的所有元素插入到 list1 的指定位置,list2
变为空。
单元素转移 :将 list2 中的某个元素移动到
list1 指定位置。
范围转移 :将 list2
中的一个范围内的元素插入到 list1 指定位置。
那可不可以用于单个 list 呢?
void splice( iterator position, list & x )
不可以
void splice( iterator position, list &, iterator first, iterator last )
可以,但要保证 position 迭代器不要包含在 [first,last) 区间。
1 2 3 4 5 6 7 list<int > data = { 1 , 2 , 3 , 4 , 5 , 6 };auto it = data.begin ();splice ( data.begin (), data, it, data.end () );
void splice( iterator position, list &, iterator i )
可以,如果 position 和 i 相同,保持不变。
1 2 3 4 5 6 list<int > data = { 1 , 2 , 3 , 4 , 5 , 6 };auto it = data.begin ();splice ( data.begin (), data, it );
unique 1 2 3 4 5 6 7 8 9 10 11 12 13 14 15 16 17 18 19 20 21 22 23 template <typename _Tp, typename _Alloc>typename list<_Tp, _Alloc>::__remove_return_typeunique ()begin ();end ();if ( __first == __last )return (_GLIBCXX20_ONLY( 0 ) );0 ;while ( ++__next != __last )if ( *__first == *__next )else return (_GLIBCXX20_ONLY( __removed ) );
++__next != __last
循环判断,本意就是从第二个迭代器开始(因为第一个迭代器必然不会有被去重的可能而被移除,因此在接口的开始会判断
__first == __last 会直接返回)遍历到整个 list 的末尾。
如果 *__first == *__next 就删除当前迭代器
__next;否则,就更新 __first 和
__next 两个迭代器往前进一步, __next
的实际递增会在 while 循环中递增。
remove 1 2 3 4 5 6 7 8 9 10 11 12 13 14 15 16 17 18 19 20 21 22 23 24 25 26 27 28 29 30 31 template <typename _Tp, typename _Alloc>typename list<_Tp, _Alloc>::__remove_return_typeremove ( const value_type & __value )0 ;begin (); end ();while ( __first != __last ) if ( *__first == __value ) if ( std::__addressof( *__first ) != std::__addressof( __value ) )else if ( __extra != __last )return (_GLIBCXX20_ONLY( __removed ) );
remove
删除指定的元素,是把所有与之相等的元素删除,绝非只删除一个。
remove_if 1 2 3 4 5 6 7 8 9 10 11 12 13 14 15 16 17 18 19 20 21 22 template <typename _Tp, typename _Alloc>template <typename _Predicate>typename list<_Tp, _Alloc>::__remove_return_typeremove_if ( _Predicate __pred )0 ;begin ();end ();while ( __first != __last ) if ( __pred( *__first ) )return (_GLIBCXX20_ONLY( __removed ) );
接受一个函数对象,该函数对象需要接受一个参数,见代码中
__pred( *__first ) 。会遍历所有元素,并逐一传递给
__pred
函数对象进行处理,我们自己只需要把实现的逻辑写在传递的函数对象
__pred 中即可。
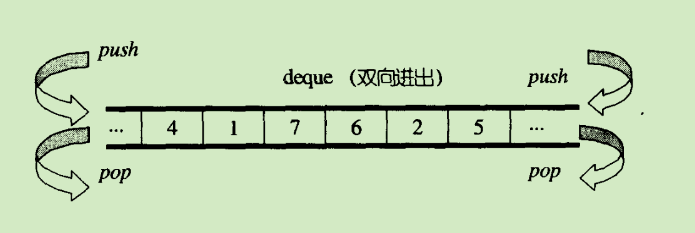
deque 它看起来就像是一个数组,支持头部插入和删除,尾部插入和删除。
deque.png
我们在使用的时候就可以像使用数组一样,但是有必要去搞清楚它的底层结构是怎么构成的。
1
2
3
4
5
6
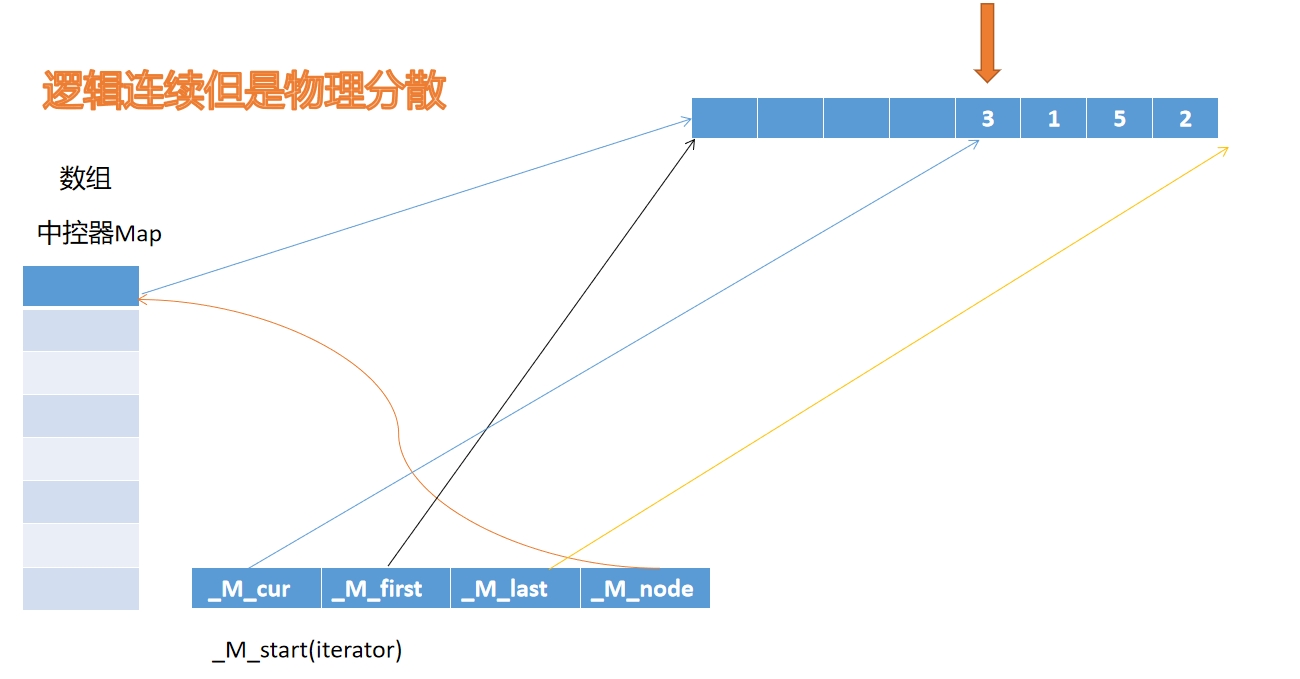
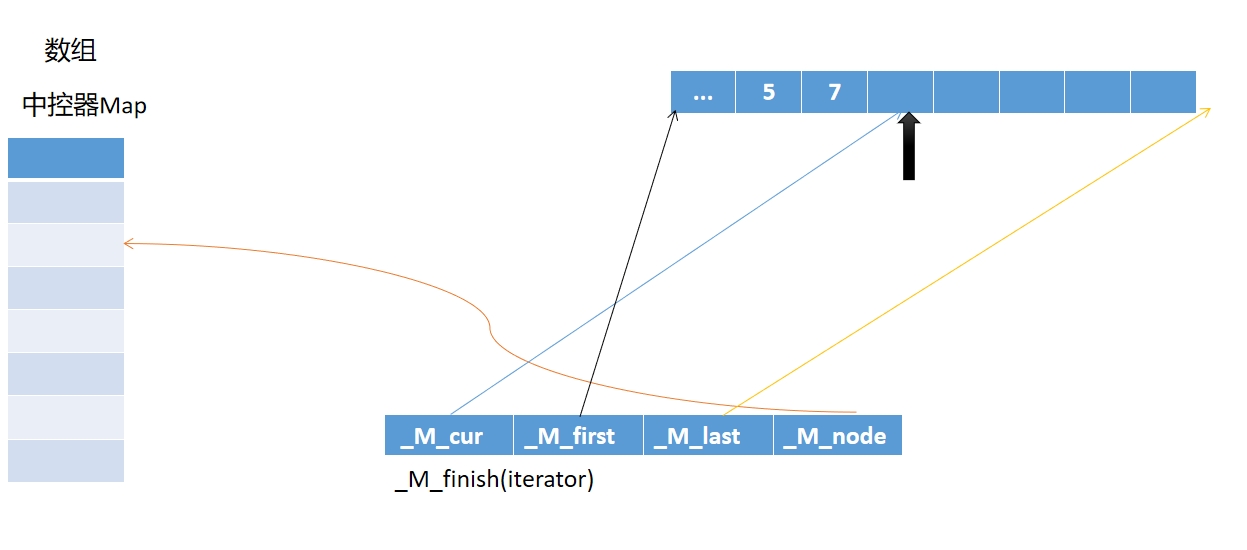
示意图:中控器 Map
中的一个节点(下标)和其指向的内存区域构成上述数据结构。
d1.png
也就是说 deque 中物理内存是部分连续的,中控器 Map
中存储的下标就指向这块连续的内存,而各个下标指向的内存区域之间是分散的,没有关联。见下图:
d2.png
实际上整个 deque 是由三个指针进行管理:
1 2 3 4 iterator start;
中控器 map 里面存储一个一个的指针,指针指向一块连续的内存。start
是中控器 map 里面存储的第一个指针,finish 是中控器 map
里面存储的最后一个指针。
操作 为何vector不支持在头部进行插入元素与删除元素呢? 因为前面头部插入或删除必然导致所有元素全部向后或向前移动,这在性能能上损失很多。
deque 和 list 本身底层数据结构的缘故,支持头部插入和删除。
序列式容器的删除 (一)vector删除连续重复元素
1 2 3 4 5 6 7 8 9 10 11 vector<int > data = { 1 , 2 , 3 , 3 , 3 , 5 };for ( auto i = data.begin (); i != data.end (); )if ( *i == 3 )erase ( i );else {
由于 vector
删除指定的迭代器,其本质行为是后面的迭代器往前移动,这也是为什么我们不会在
erase 之后进行迭代器 i 的更新。但如果没有进行 erase 行为,那就需要通过
递增迭代器指向下一个迭代器。
但我们这种写法不具有通用性,到 list
删除的时候就有问题,下面这种是通用写法:
1 2 3 4 5 6 7 8 9 10 11 vector<int > data = { 1 , 2 , 3 , 3 , 3 , 5 };for ( auto i = data.begin (); i != data.end (); )if ( *i == 3 )erase ( i );else {
下面这种常见错误的写法,你也明白原因了:
1 2 3 4 5 6 7 for (auto p1 = v1. begin (); p1 != v1. end ();p1++)if (*p1 == 9 )1. erase (p1);
(二)list删除连续重复元素
1 2 3 4 5 6 7 8 9 10 11 list<int > data = { 1 , 2 , 3 , 3 , 3 , 5 };for ( auto i = data.begin (); i != data.end (); )if ( *i == 3 )erase ( i );else {
list 的内存不是连续的,也就无法保证 i 在被删除之后,能够像前面介绍
vector
那样可以不更新迭代器也可以平替(尽管后面也补充通用写法),所以我们需要用被删除的迭代器用来接收
erase 之后的返回值,达到更新迭代器 i 的效果。
