经过前面几章节的训练,基于
Asio
实现HTTP服务器 也不难,但是这种造轮子行为还是不推荐的,下面就介绍如何基于
Beast 库实现 HTTP 和 WebSocket 服务器。
Boost.Beast 是基于 Boost.Asio 的 C++ 网络库,用于处理 HTTP 和
WebSocket 协议。它简化了处理 HTTP 和 WebSocket
请求与响应的过程,同时提供高效的异步操作,广泛用于开发高性能网络应用。
文档地址:Beast官方文档
接口 完整的 HTTP 消息使用 message class 建模,用户可进行自定义。
1 2 3 4 5 6 7 8 9 10 11 12 13 14 template <bool isRequest, class Body , class Fields = fields> class message;template <class Body , class Fields = fields>using request = message<true , Body, Fields>;template <class Body , class Fields = fields>using response = message<false , Body, Fields>;
从上面的模板可以看出,message 通过 第一个参数来区分 request 和
response,然后第三个参数 有默认参数。所以,对于 创建 request 和 response
的时候必须填写的参数是 Body,Fields 是可选的。
Body.png
这里面值得一提的是 DynamicBuffer
动态缓冲区。
动态缓冲区封装了内存存储,该存储可以根据需要自动调整大小,其中内存分为输入序列和输出序列。这些内存区域是动态缓冲区的内部,但提供了对元素的直接访问,以允许它们有效地用于
I/O 操作,例如套接字的发送或接收操作。
写入动态缓冲区对象输出序列的数据将追加到同一对象的输入序列中。
如果你要存储 request 和 response ,可以如下定义:
1
2
3
4
5
namespace beast = boost::beast; namespace http = beast::http;
等后面我们学习消息的发送和接受,就能用到了。
这里记录一下官方的使用案例:
我们构建了一个带有空消息正文的 HTTP GET 请求。
createReq.png
我们创建了一个 HTTP 响应,状态代码表示成功。
createRes.png
我们前面处理的消息是包含 body + header,如果你只需要处理
header,beast 也支持。
1 2 3 4 5 6 7 8 9 10 11 12 13 14 template <bool isRequest, class Fields = fields> class header;template <class Fields >using request_header = header<true , Fields>;template <class Fields >using response_header = header<false , Fields>;
提供 read、async_read 等函数用于从流中读取
HTTP 消息数据。
提供 write、async_write 等函数用于将 HTTP
消息写入流中。
messageStream.png
我们直接看官方案例就好,这些函数的含义在前面的章节已经学习过,尽管参数的类型可能会有所不同。
这个参数类型就是 flat_buffer ,通常用于处理网络
I/O 操作中的可变大小的字节序列。而且,它非常适合和前面讲的 动态缓冲区
结合使用。
(一)Reading
同步读:
1
2
3
flat_buffer buffer;read (sock, buffer, req);
异步读:
1
2
3
4
5
6
7
8
flat_buffer buffer;async_read (sock, buffer, res,size_t bytes_transferred)ignore_unused (bytes_transferred);message () << std::endl;
用于限制 HTTP 消息标头的最大大小的技术,以防止缓冲区溢出攻击:
1
2
3
4
5
6
7
flat_buffer buffer{10 };read (sock, buffer, req, ec);if (ec == http::error::buffer_overflow)"Buffer limit exceeded!" << std::endl;
(二)Writing
同步写:
1
2
3
4
5
6
7
8
9
response<string_body> res;version (11 );result (status::ok);set (field::server, "Beast" );body () = "Hello, world!" ;prepare_payload ();write (sock, res, ec);
异步写:
1
2
3
4
5
6
7
async_write (sock, res,size_t bytes_transferred)ignore_unused (bytes_transferred);if (ec)message () << std::endl;
Serialization 将 HTTP 消息转化为字节缓冲区。
1 2 3 4 5 6 7 8 9 10 11 12 13 14 15 16 17 18 19 20 21 22 template <bool isRequest,class Body ,class Fields = fieldsclass serializer;template <class Body ,class Fields = fieldsusing request_serializer = serializer<true , Body, Fields>;template <class Body ,class Fields = fieldsusing response_serializer = serializer<false , Body, Fields>;
其实这不难理解,就是我们构建 HTTP
数据包,将其序列化后就可以发送出去了。
1 2 3 4 5 6 7 8 9 10 11 12 13 14 15 16 17 18 19 11 };set (http::field::server, "Beast" );set (http::field::content_type, "text/plain" );body () = "Hello, World!" ;prepare_payload (); while (! sr.is_done ()) {write_some (socket, sr, ec); if (ec) {"Error: " << ec.message () << std::endl;break ;
按照常见的通信模式来看,服务器需要进行序列化(Serialization),而客户端需要进行反序列化(Parsing)。下面看看可用的传输序列化数据的操作:
Serializer_Stream.png
Parsing 将字节缓冲区解析为 HTTP 消息。
1 2 3 4 5 6 7 8 9 10 11 12 13 14 15 template <bool isRequest, class Body , class Allocator = std::allocator<char >> class parserpublic basic_parser<...>;template <class Body , class Allocator = std::allocator<char >>using request_parser = parser<true , Body, Allocator>;template <class Body , class Allocator = std::allocator<char >>using response_parser = parser<false , Body, Allocator>;
比方说我们构造 HTTP 请求发给 百度,然后将百度的 response
进行解析,通过 get 方法获取解析结果。下面仅记录核心代码:
1 2 3 4 5 6 7 8 9 10 11 12 13 14 15 16 17 18 19 20 21 22 23 24 25 26 27 28 29 30 31 32 "/" , 11 };set (http::field::host, "www.baidu.com" );set (http::field::user_agent, BOOST_BEAST_VERSION_STRING);write (socket, req);read (socket, buffer, parser);auto const & response = parser.get ();"Status: " << response.result_int () << std::endl;if (response.find (http::field::content_length) != response.end ()) {"Content-Length: " << response[http::field::content_length] << std::endl;if (response.find (http::field::content_type) != response.end ()) {"Content-Type: " << response[http::field::content_type] << std::endl;
解析结果:
HTTPdemo.png
通过 get 获取整个 HTTP 消息的 header + body,我们常常需要获取 header
中的字段信息,部分字段可直接调用接口,其余字段需要通过 find
方法查找。我们讲完 response_parse ,也就 自然领会
request_parse,它们的操作也都是一致的。
Parser_Stream.png
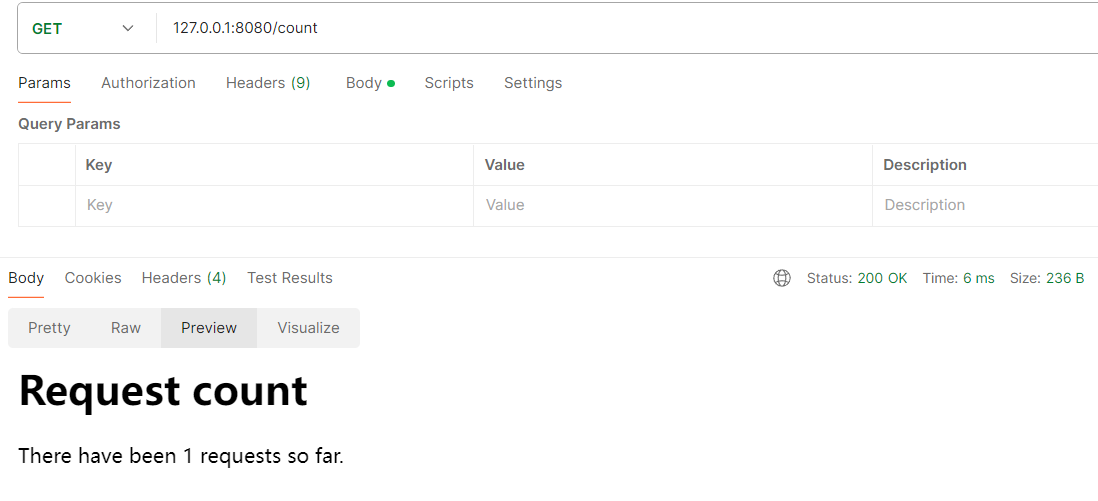
代码实现和测试 get 请求测试
get请求.png
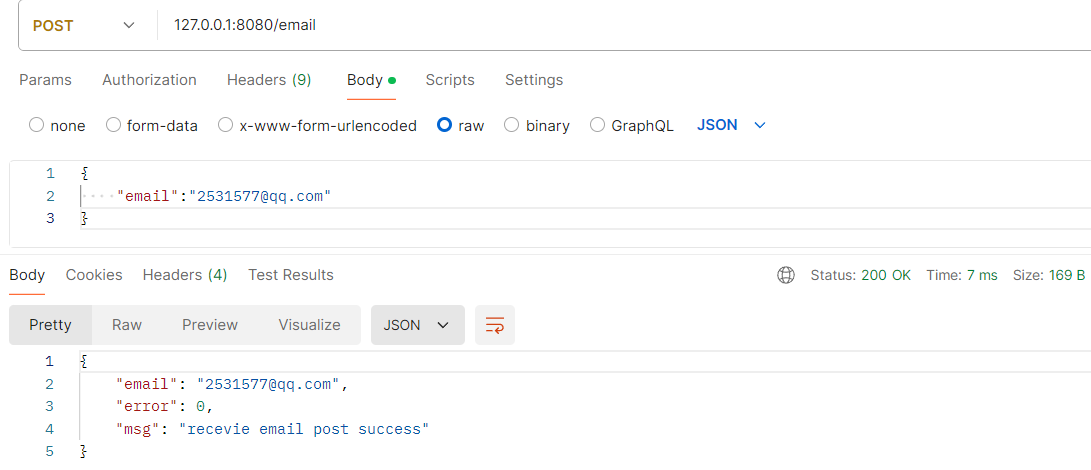
post 请求测试
post请求.png
测试工具:Postman
代码地址:实现HttpServer
⭐️内容取自 B 站 UP 恋恋风辰和 mmoaay 的《Boost.Asio C++
网络编程》,仅从中取出个人以为需要纪录的内容。不追求内容的完整性,却也不会丢失所记内容的逻辑性。如果需要了解细致,建议看原视频或者读原书。


